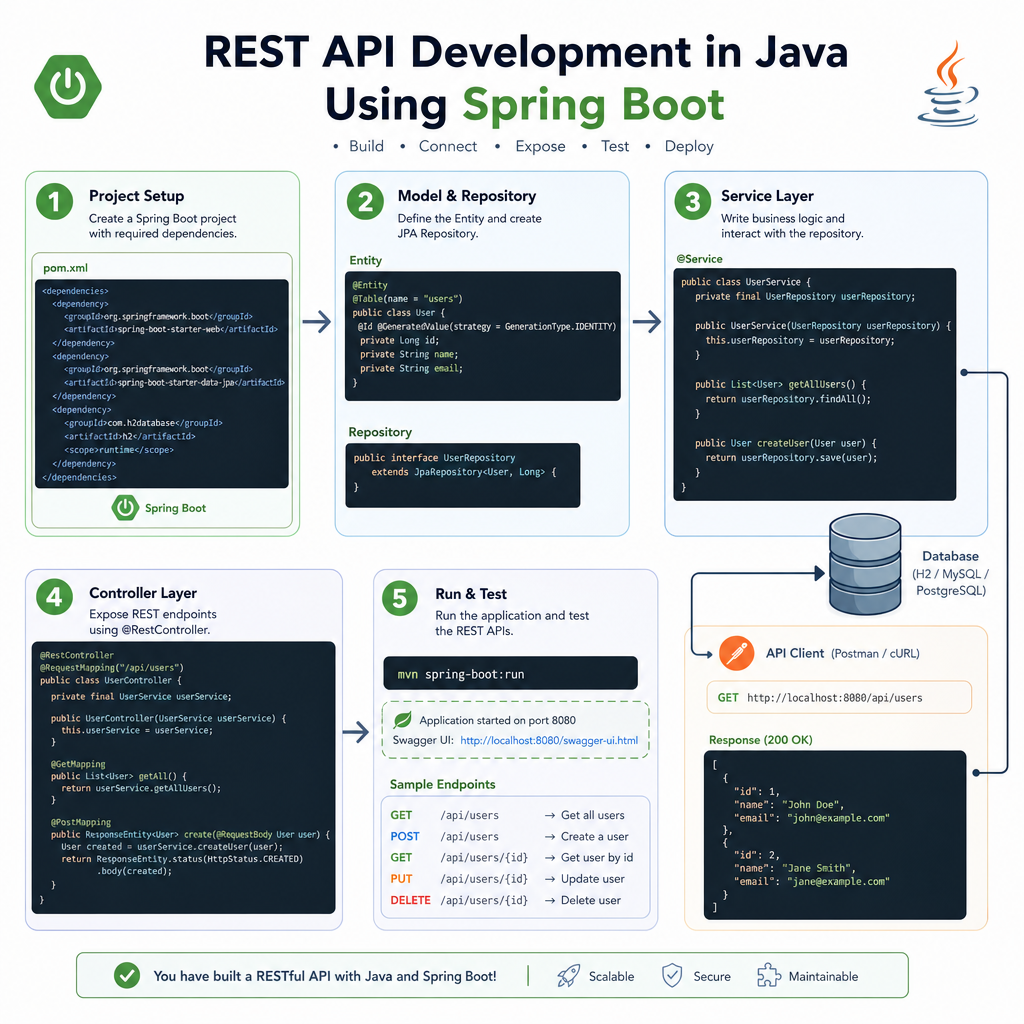

Crafting RESTful APIs with Java: A Step-by-Step Guide
RESTful APIs are an integral part of modern web architecture, facilitating seamless communication between clients and servers. Java, with its robust ecosystem and support for RESTful principles, is a great choice for building APIs. In this guide, we will use Spring Boot, an opinionated Java framework, to create a simple, efficient RESTful API. Let’s dive into the build process, covering endpoints, CRUD operations, and JSON handling.
1. Setting Up Your Spring Boot Project
To get started with Spring Boot, we first need to set up our development environment. You can create a new project using Spring Initializr, which provides a quick and easy setup for Spring projects. Go to Spring Initializr and fill in the project details: select Java, Spring Boot version, and dependencies such as Spring Web.
mvn spring-boot:runThis command initializes the Spring Boot application. You should now have a basic structure with predefined dependencies and configuration in your project.
2. Creating the Model
For this example, let’s consider an API that handles `Book` entities. We’ll start by defining our `Book` model, which will be the foundation of our operations:
public class Book { private Long id; private String title; private String author; // Getters and setters }This POJO (Plain Old Java Object) defines the properties of a book, adhering to standard Java conventions with getters and setters.
3. Building a Repository Interface
The next step is using Spring Data JPA to communicate with our database. For this, we need a repository interface for basic CRUD operations. By extending `JpaRepository`, we inherit several methods for handling CRUD operations:
public interface BookRepository extends JpaRepository<Book, Long> {}With this simple interface, Spring Data JPA generates the implementation, allowing you to perform database operations without writing verbose code.
4. Creating the REST Controller
The heart of our API is the controller, where we define endpoints for our RESTful operations. Begin by creating a Spring Controller:
@RestController@RequestMapping("/api/books")public class BookController { @Autowired private BookRepository bookRepository; @GetMapping public List<Book> getAllBooks() { return bookRepository.findAll(); } @PostMapping public Book createBook(@RequestBody Book book) { return bookRepository.save(book); }}We’ve set up two endpoints: one for retrieving all books and another for creating a new book. Notice how we use `@GetMapping` and `@PostMapping` to map HTTP GET and POST requests, respectively.
5. Parsing and Handling JSON
Spring Boot handles JSON mapping seamlessly due to its built-in support for Jackson. When a client sends a JSON payload, Spring automatically serializes it into Java objects and vice versa:
@PostMapping public Book createBook(@RequestBody Book book) { return bookRepository.save(book); }The `@RequestBody` annotation tells Spring to deserialize the JSON from the request body into a `Book` object.
Conclusion and Next Steps
You’ve now built a simple yet effective RESTful API using Java and Spring Boot. This involves setting up the project, creating models, repositories, controllers, and implementing JSON handling. For further improvements, consider adding error handling, validation, or exploring Spring Security for authentication and authorization purposes. This foundation offers extensive scalability and flexibility for your API needs.
Useful links: